While General Grant and the Army of the Potomac were still stuck at Petersburg, the Union scored various victories in late 1864 that hastened the end of the Confederacy and ensured Abraham Lincoln's reelection as President. Naturally Union veteran Louis Kurz would feature some of these victories in his lithographs, two from Union General Phil Sheridan's Shenandoah Valley Campaign and two from Confederate John Bell Hood's ill-devised Tennessee offensive.
Battle of Opequan or Winchester

The title for this lithograph is somewhat misleading. Opequan is in fact spelled Opequon and this is the Third Battle of Winchester. To be fair to Kurz this is the largest Winchester battle of the war (Winchester changed hands at least 72 times). This was a major battle of the 1864 Shenandoah Valley Campaign. General Jubal Early and his Confederates had been running rampant, even approaching Washington D.C. itself. Newly arrived the aggressive Sheridan was determined to end his run. On September 19 he assailed the Confederates along Opequon Creek. The Federals broke through, only to be repulsed by canister fire. General Wesley Merrit's cavalry brigade got into the Confederate rear and after confused fighting Early withdrew to Fisher's Hill, the site of the next battle. This started a string of defeats for the Confederates in the Valley.
I'm not as familiar with the small details of this battle so I might miss some major inaccuracies. Sheridan was an advocate of more aggressive cavalry use, so it's not unheard for horsemen to charge into the fray in his battles. The cavalry. Opequon Creek is nowhere in sight. Overall this is a general Union and Confederates square off lithograph with cavalry playing a more visible role.
Battle of Cedar Creek
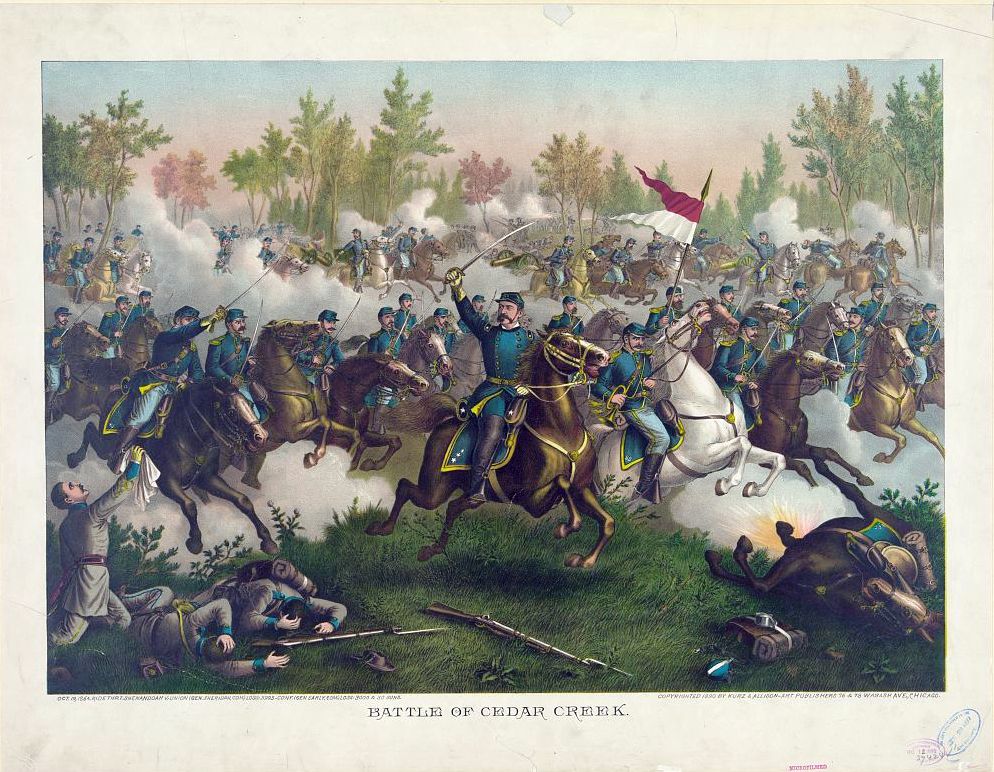
In mid-October Sheridan was summoned to Washington to discuss his plans with the War Department. On October 19 General Early launched a surprise attack on the Union camp at Cedar Creek. The Federals were sent running, but the Confederates, starved, did not follow up their success and spent time searching the captured tents for food. Learning what was happening, Sheridan (who was in Winchester at the moment) saddled up and rallied his routed men immediately. This event, known as Sheridan's Ride, led the Union army to return to Cedar Creek and send the enemy running. This was the last major battle in the Shenandoah Valley.
One of the enduring moments of the Union Army, there was no way Kurz would not depict the victory at Cedar Creek. Unlike most of his lithographs where the two sides square off on either side, this image is focused dead center on a mounted Sheridan and his cavalry. Sheridan did not personally lead the men into the thick of the fight and this is more of a representative celebration of his crucial role in turning the tide of battle. Still, the cavalry was heavily involved with General George Custer taking a large hand. The Confederates are less visible in this lithograph. In the left foreground one wounded man waves a white cloth in surrender while two of his comrades lay dead. More can be seen in the background facing the other way, indicating that their line has been deeply penetrated.
Battle of Franklin

When General Sherman started his March to the Sea, Hood did not try to stand in his way with the Army of Tennessee, but instead dreamed up an offensive into Tennessee. His plan was to destroy Sherman's already lengthy line of communication and supply while also reconquering lost territory. The campaign was a series of mistakes and blunders. On November 30 Hood ordered frontal assaults on the earthworks around Franklin. Though the Confederates penetrated the Union line at the Carter house, they ultimately retreated with horrendous casualties, including 14 generals killed.
This is perhaps the most inaccurate Civil War lithograph by Kurz. The only thing he gets right is that the Confederates were the attackers. The terrain is the most unhistorical element. Confederates are assaulting steep rocky hills instead of the real life fences and earthworks. Kurz also fails to convey how destructive this battle was for Hood's army. The background shows the Harpeth River, where Federals and their supply wagons try to cross. While the river and its bridges were there, there was no sparring from the bridge.
Battle of Nashville

Despite wrecking his army in fruitless assaults at Franklin, Hood tried to besiege General George Thomas' hastily assembled force at Nashville. Despite persistent urging from Washington and General Grant, Thomas took his time organizing his army for an attack. When he finally unleashed it on December 15 he drove the Confederates back. Hood was able to organize a stronger line which was attacked the following day. This time the Federals struggled more, but when Hood reinforced his right flank in response to a near-breakthrough there, they smashed his left and effectively shattered the Army of Tennessee.
This is much better than the Franklin lithograph. It conveys how broken the Confederate army is. A group of wounded and despondent men surrender while others are literally bowled over by the cavalry. The bleak terrain helps out as well. Kurz mixes assaults on the Confederate left and right flanks. On the left is General James Wilson's cavalry, which took a very active role in the battle's action and contributed to the heavy number of Confederate prisoners. At the crest of the hill black soldiers charge into a Confederate battery (the only Rebels to be shown fighting). A white officer holding a flag urges them on. This was the only large-scale battle to see active participation by black troops.
No comments:
Post a Comment